In order to do this the first thing you’re going to want to do is find your way to a command line console either by using the shell button in the web interface or by logging into your server using a keyboard mouse and monitor well maybe not the mouse but you know what I mean let me say hope you do.
Now that you’ve logged in and you’re out of command line enter the command IP address
ip address
You will get an output like the one you see below
At first this output may look like a bunch of gibberish but all the information you will need is in this output look at the picture below and I have drawn a red box around the information you need to know to find the name of your network controller in Proxmox
Some time ago we made a video about how to enlarge a VM hard drive in proxmox. This video seemed to have confused who are the amount of the viewers because they couldn’t figure out why the drive wouldn’t enlarge in the operating system itself. We took some time to remake the video and explain that this video is only for proxmox you need to take other steps inside of your operating system to be able to use the newly allocated space to your VM. Here is the video below on how to resize a VM storage drive inside of proxmox.
If something happened during your setup of your proxmox server or maybe you’ve changed your configuration somehow you might find yourself needing to modify your network settings or add a USB Ethernet port to your proxmox server but not have access to your web interface this tutorial will show you how to add a USB Ethernet port or modify your Ethernet settings so that you can regain access to your proxmox web interface.
The first thing you need to do is set up a keyboard and mouse on your Proxmox server and log in to your proxmox server to log in you should use the same password that you would use for your web interface or if you haven’t yet logged into a web interface the password and username that you set up during the installation of proxmox in most cases this username will be root.
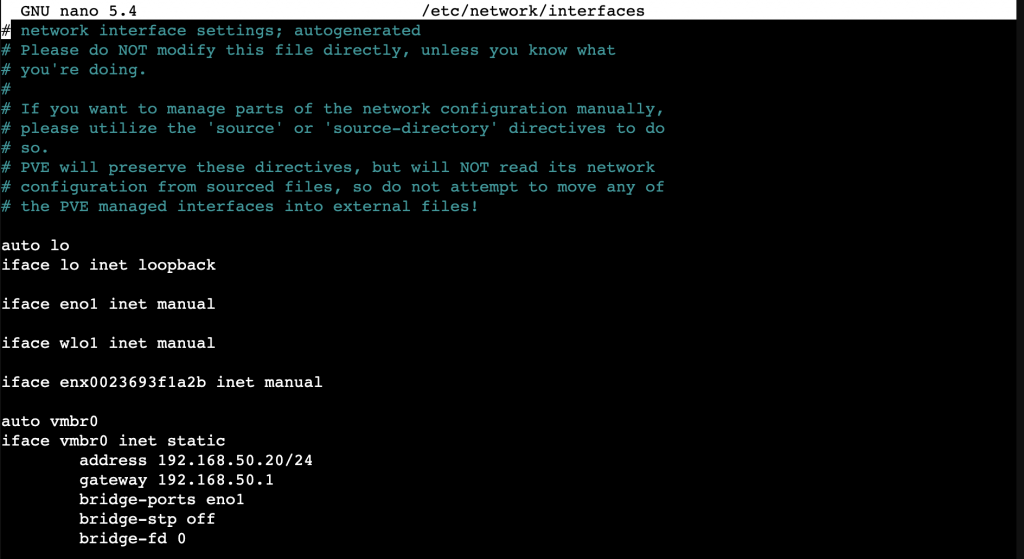
Once you have logged in enter the command seen below this will open the configuration file that you need to configure to get your network bridge working in your proxmox server using a text editor called nano
nano /etc/network/interfaces
Your file should look somewhat like the one below.
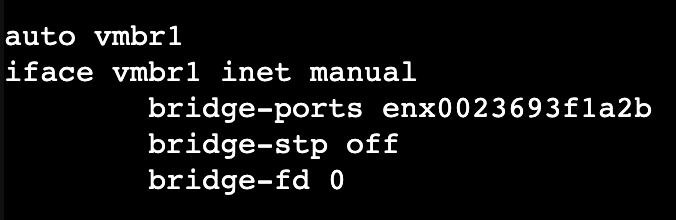
The picture below shows you the lines you need to add to set up your new network bridge. No you may need to add the address line as well as the gateway line depending on your network setup only one bridge can have a gateway address multiple bridges can have IP addresses but they are not required for the functionality of the bridge only to interact with the proxmox server itself.
auto vmbr1
iface vmbr1 inet manual
        bridge-ports [port name]
        bridge-stp off
        bridge-fd 0
Note: you will have to change the name of the Bridge port to the one of your Ethernet port. In most cases you can find that name in the above section with the iface lines
In some cases and always on new proxmox installs you will also have to edit the hosts file to not point to the local host IP address. If you’re changing the interaction IP address with your proxmox server you will also have to edit this hosts file you can do that by using yeno to edit the below file.
nano /etc/hosts
Edit the IP address of the line corresponding to your proxmox servers name.
If you’d like to watch a video on this process there is one below the second-half of this video covers setting up a USB Ethernet port and bridge on your proxmox server in detail happy viewing.